How to Import Variable Product?
Kindly make sure you have created the attribute as you want to assign to a respective product.
Step 1
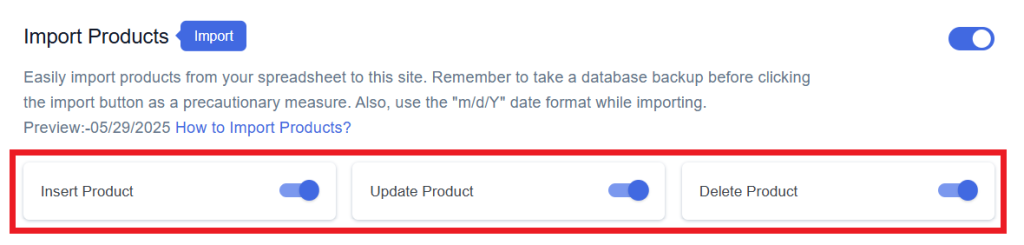
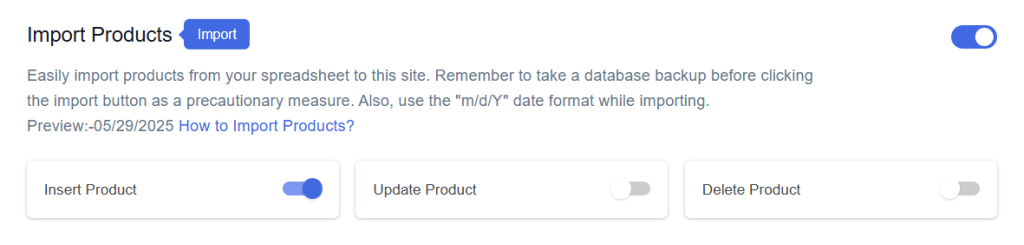
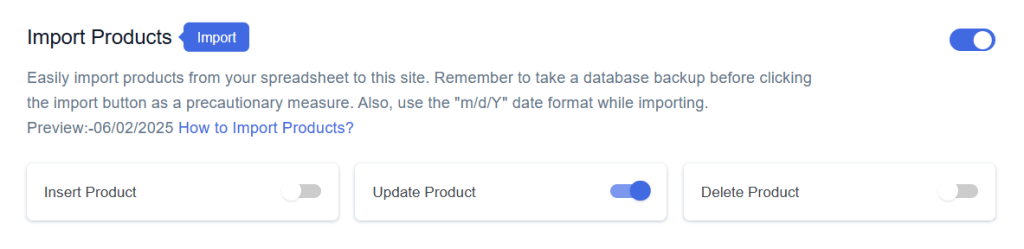
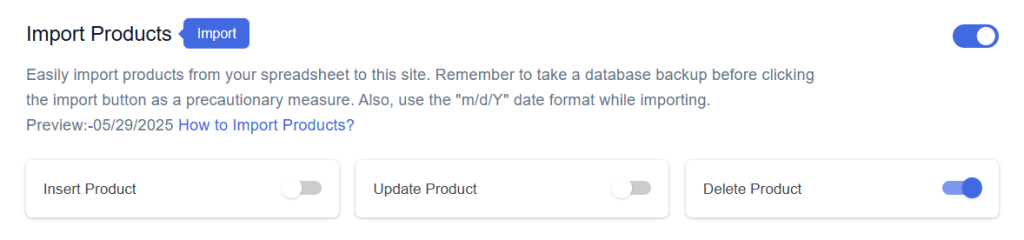
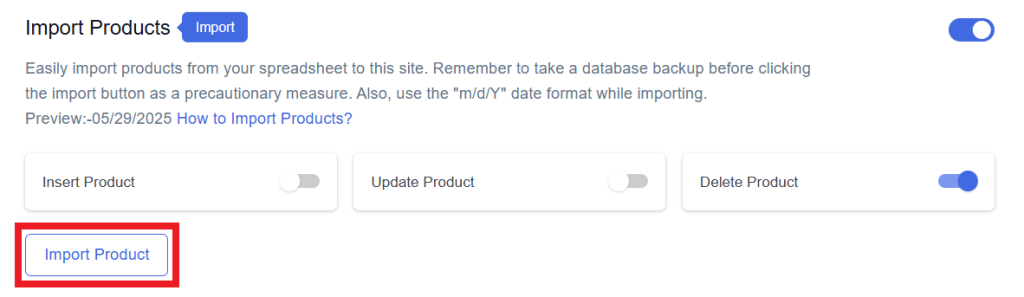
Find and enable the Import Products option and after enabling the Import Products you will see three options.

Step 2
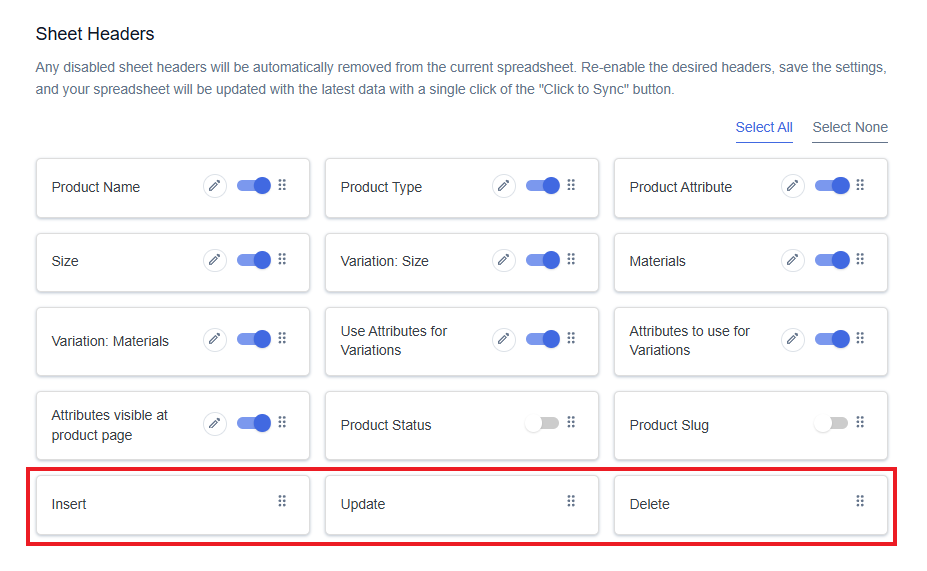
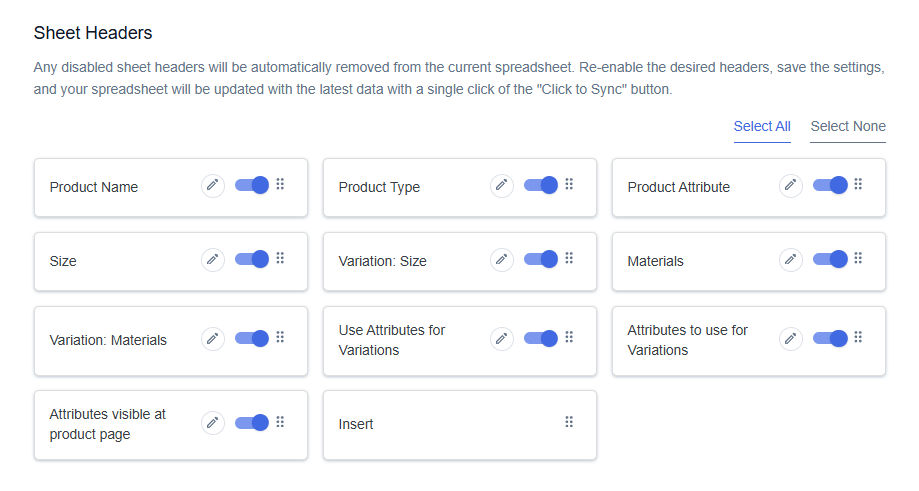
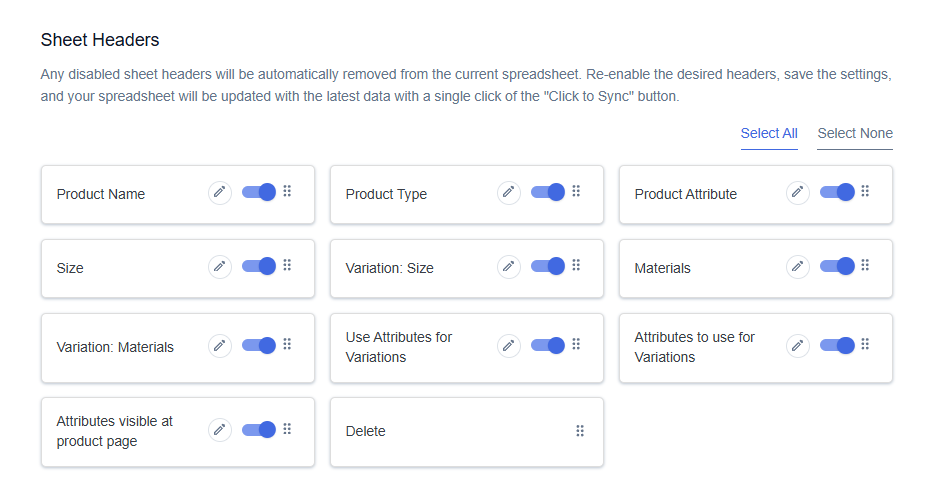
Enable/Disable the options insert/update/delete as per your requirement and Save Settings. Enabled options will be displayed in the Sheet headers.
Step 3
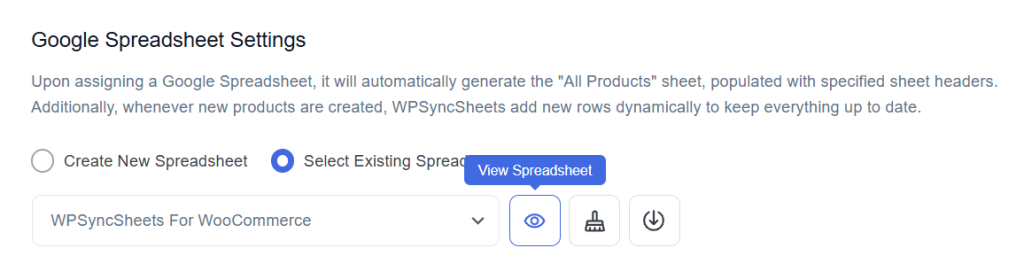
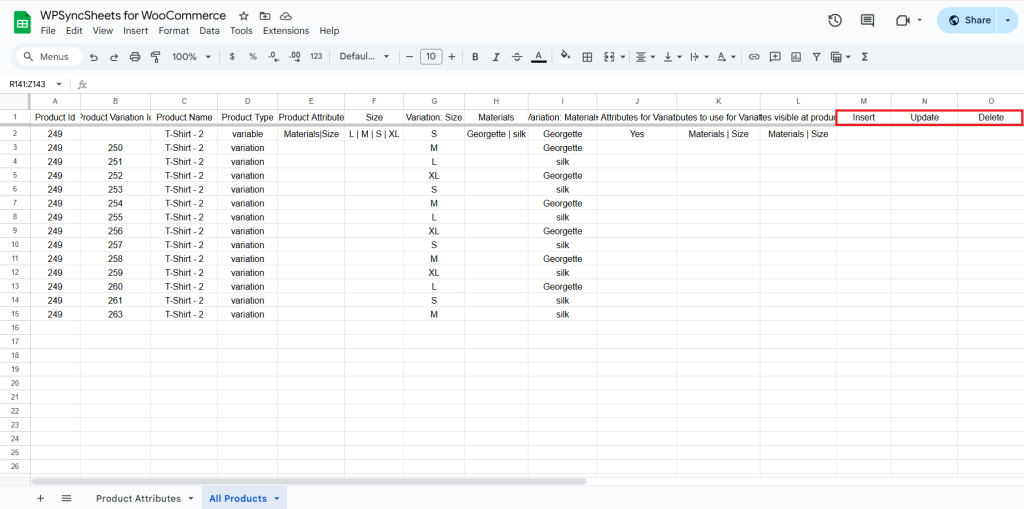
After that, in Google Spreadsheet Settings click on View Spreadsheet.
Original Spreadsheet
After save the settings, our plugin code will automatically add sheet headers respectively.
Insert Products
Step 1
Enable Insert to add your desired product in a new row.
Step 2
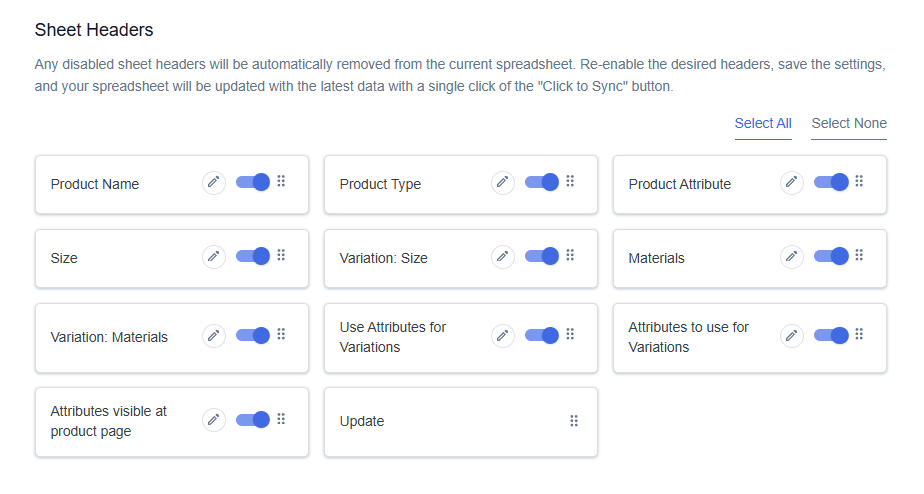
Enable/Disable the sheet headers as per your requirement and click on Save.
The attribute will be imported only if it is added. If it’s not added, the user will not be able to import the variable product.
Step 3
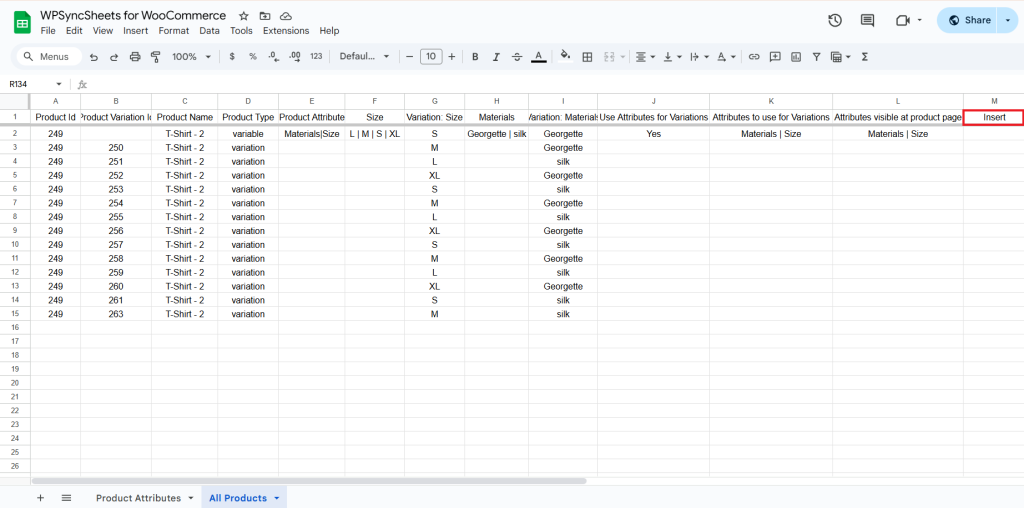
After you save the settings, you will have the “Insert” column in your connected Google Spreadsheet parallelly Import Product option in the settings page.
Step 4
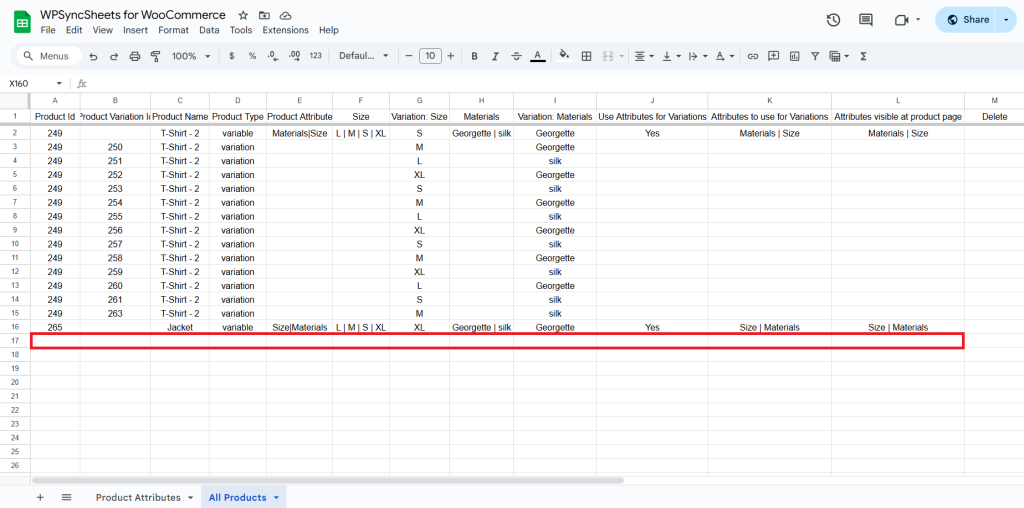
Add variable products.
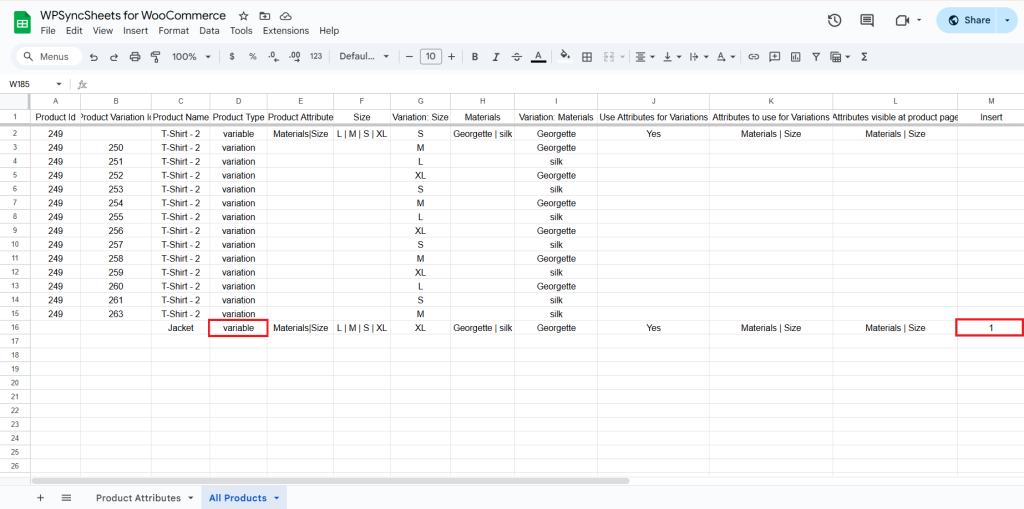
Categories and Tags: Add comma-separated names in Product Category and Product Tags columns.
Attributes: Add values in their respective attribute columns. When a product has multiple values for a single attribute (e.g., a T-shirt-2 available in both Georgette and Silk), separate each value using a pipe symbol (|). (e.g., Georgette | Silk for Materials).
We must ensure that the following instructions are followed.
- Leave the Product ID and Product variation ID blank.
- Product Name is mandatory.
- Set Product Status as publish.
- Set your Product Type as :
variable – for the main product
variation – for each variation - Product Attributes:
Define attributes like Size, Color, Material, Length, etc.
Example: Materials|Size - Variation Values:
Under headers like Variation: Size, Variation: Materials, write the value for default value.
Example: Variation: Size → XL - Use Attributes for Variations set as
yes (to use the above attributes for creating variations) - Attributes to use for Variations
Mention only those attributes that should be used as variations.
Example: Materials|Size - Attributes visible at product page
Write the attributes that you want to show on the product page.
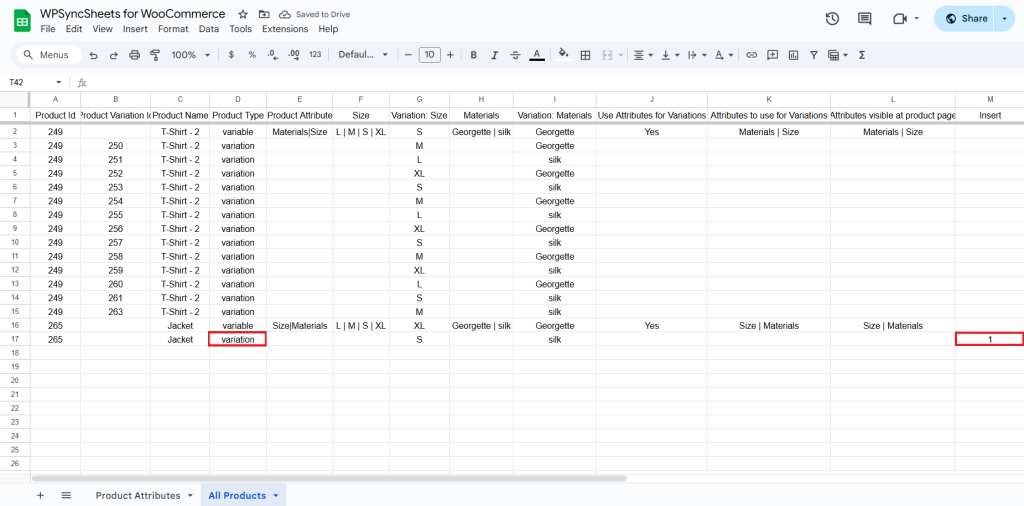
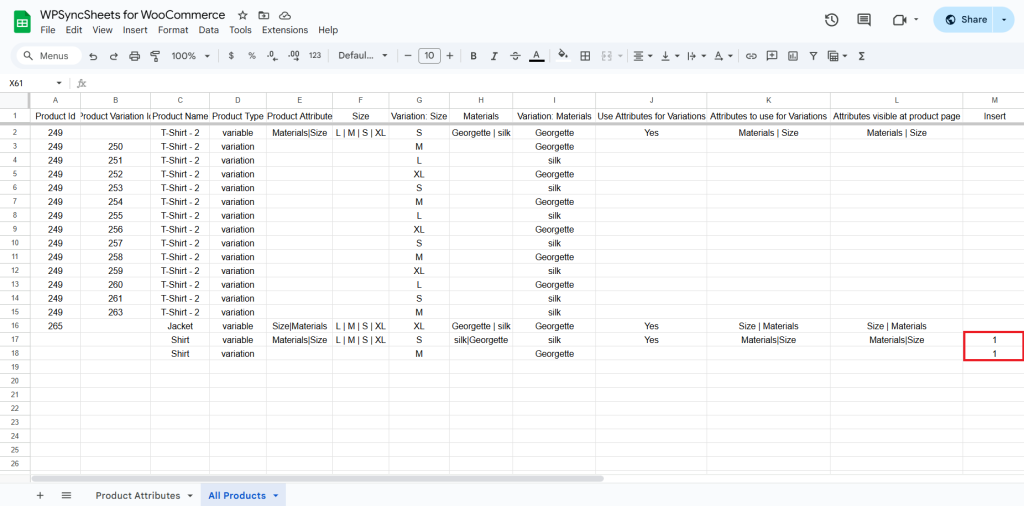
Example: Materials|Size - Go to the Insert column and type “1” in the row you want to create a new variable product.
Important Note:
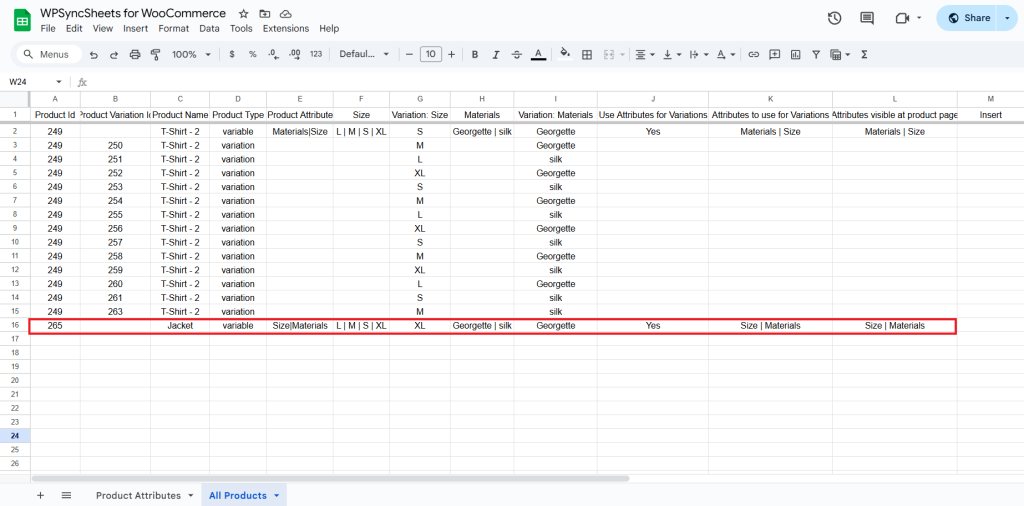
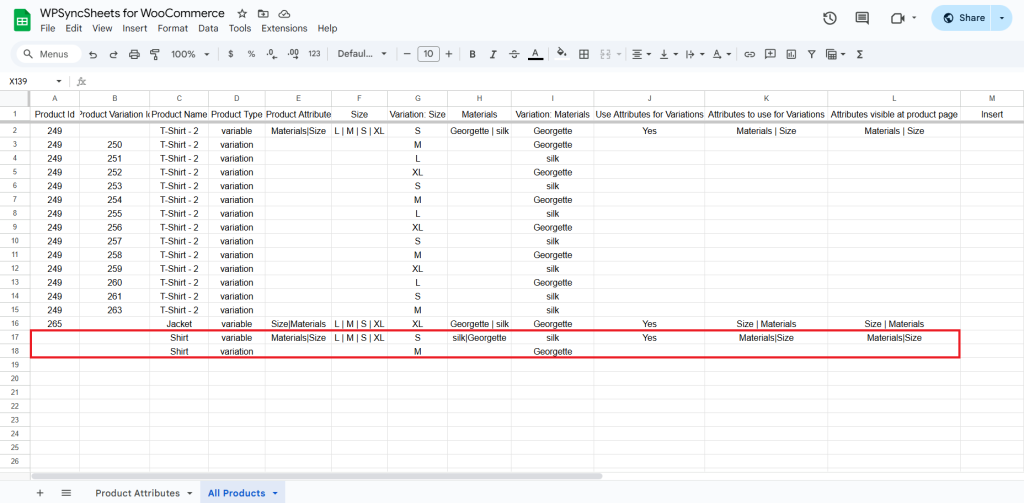
- For each variation, a separate row should be created but with the same Product ID as the parent product.
- Only values already defined in the attribute columns (like Size, Material) will be imported as variations.
- Ensure consistency in spelling and casing (e.g., Silk ≠ silk).
- Separate a multiple attributes or values using the “|” symbol.
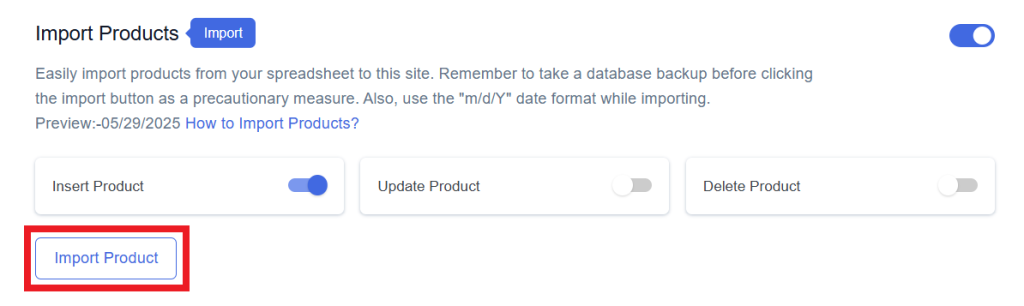
Step 5
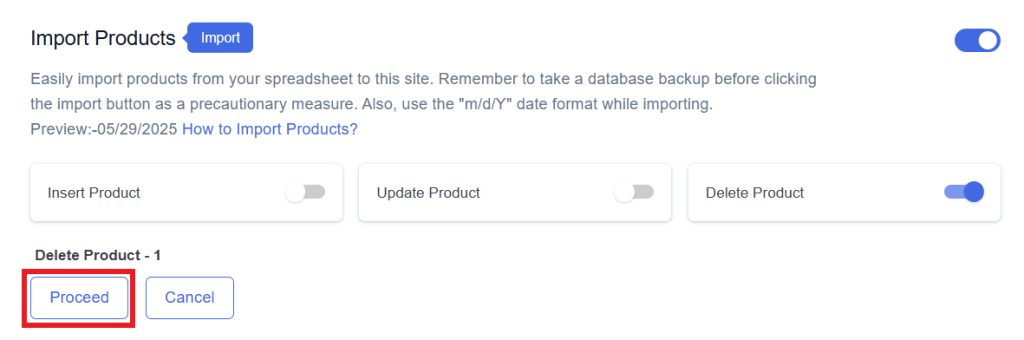
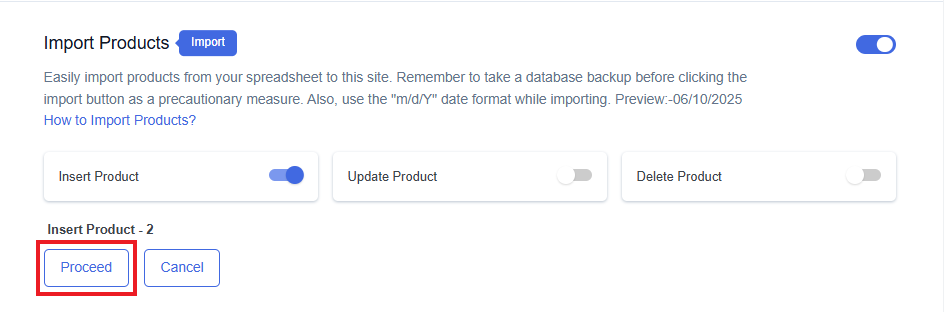
Click on the Import Product button.
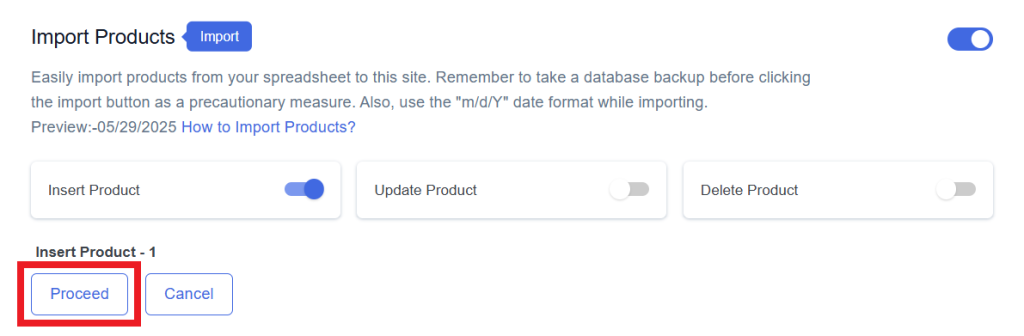
Step 6
Now, you will have the Proceed option, click on it.
Final Spreadsheet
Insert Variation
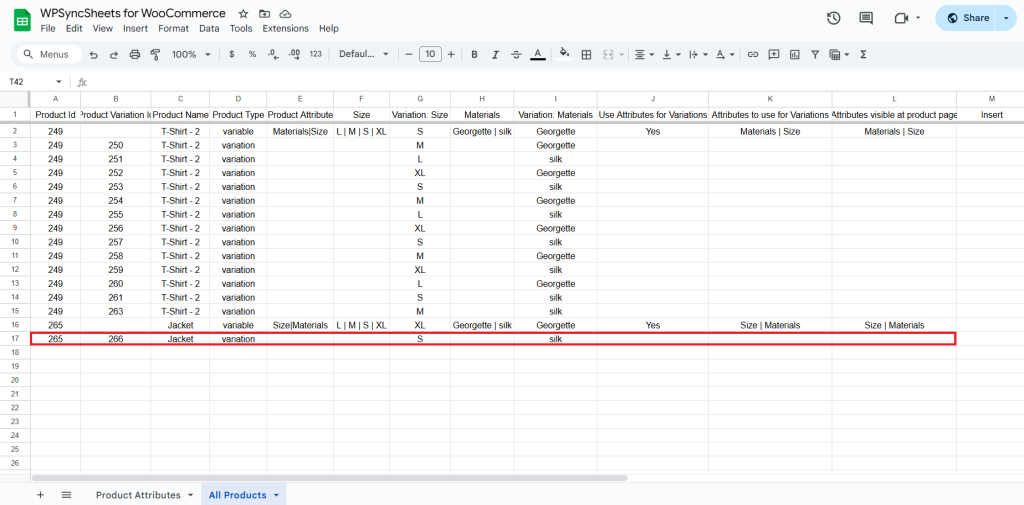
To create variations:
- Add variation rows below the parent variable product.
- Set Product Type as variation.
- Leave Product Variation Id blank.
- Add the parent’s Product ID in the Product Id column.Do not leave the Product ID empty. If you’re creating a variation, make sure to use the same Product ID as the main (variable) product. This is important because the variation will fetch details from that main product.
- Add 1 in the Insert column
- Ensure parent product type is set to variable.
- Click Import Product.

- Click on Proceed.

Final Spreadsheet
If you want to update a variation within an existing product then go here.
Update Products
Step 1
Enable Update to update your desired product.
Step 2
Enable/Disable the sheet headers as per your requirement and click on Save.
Step 3
After you save the settings, you will have the “Update” column in your connected Google Spreadsheet parallelly Import Product option in the settings page.
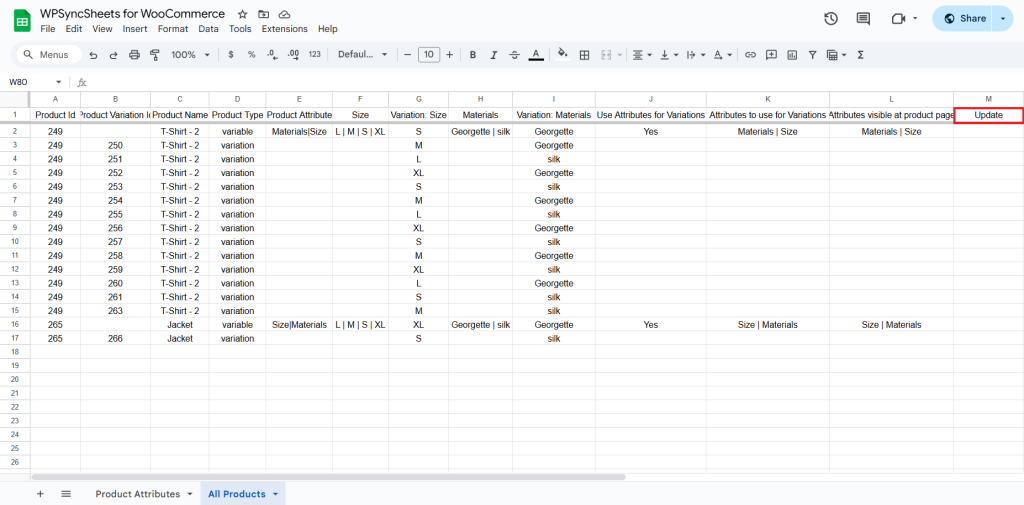
Step 4
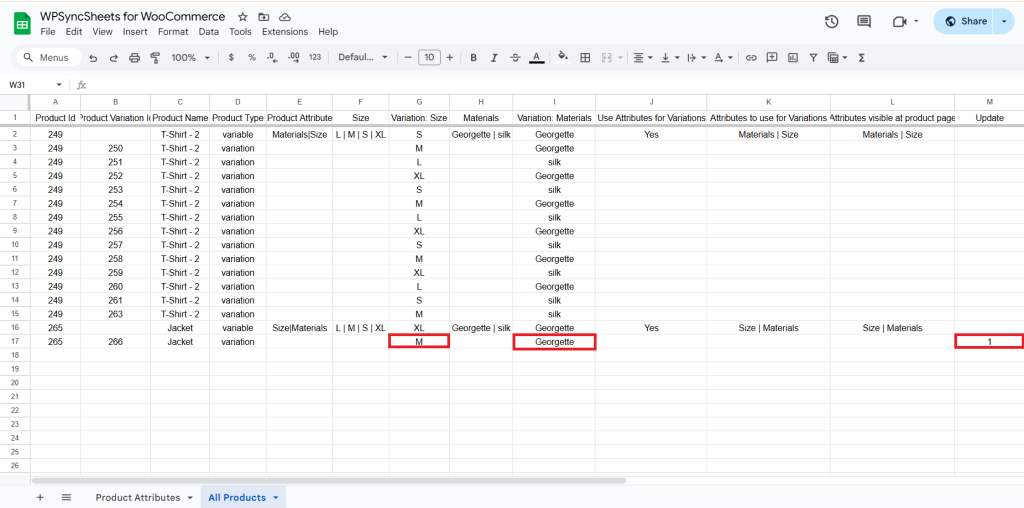
Make the changes you want and in the Update column of that row, type “1”, to update a particular product.
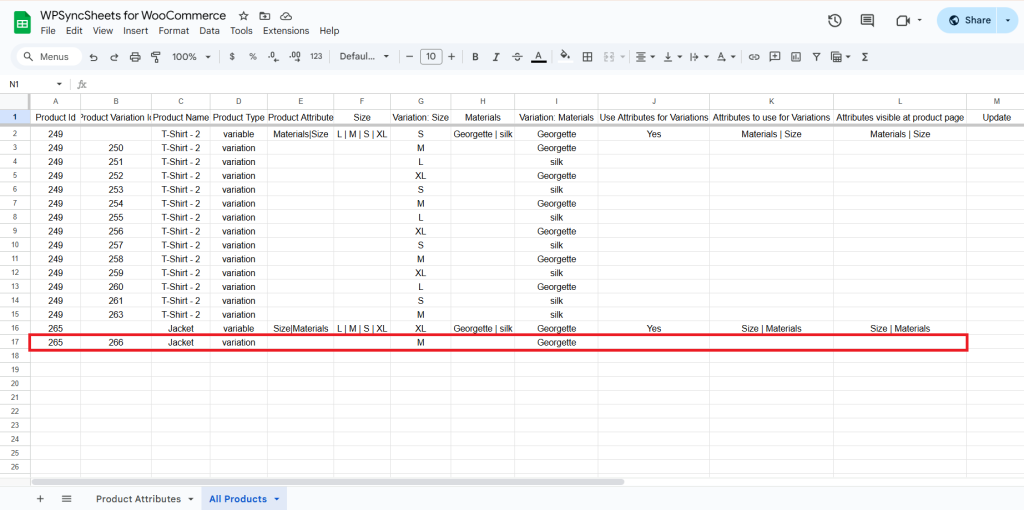
266: Variation: Size – S → M
266: Variation: Material – silk → Georgette
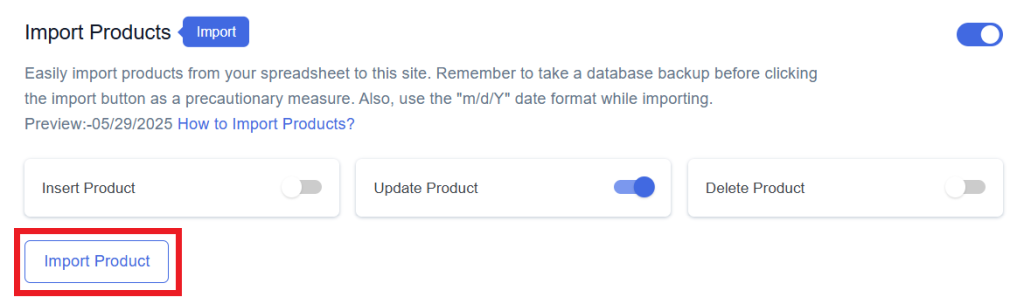
Step 5
Click on the Import Product button.
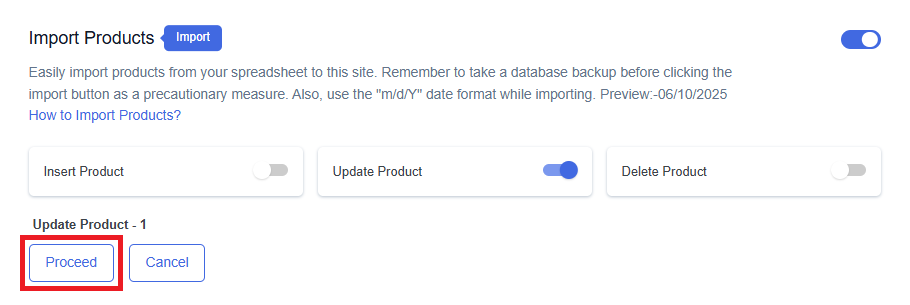
Step 6
Now, you will have the Proceed option, click on it.
Final Spreadsheet
Delete Product
Step 1
Enable Delete to delete your desired product.
Step 2
Enable/Disable the sheet headers as per your requirement and click on Save.
Step 3
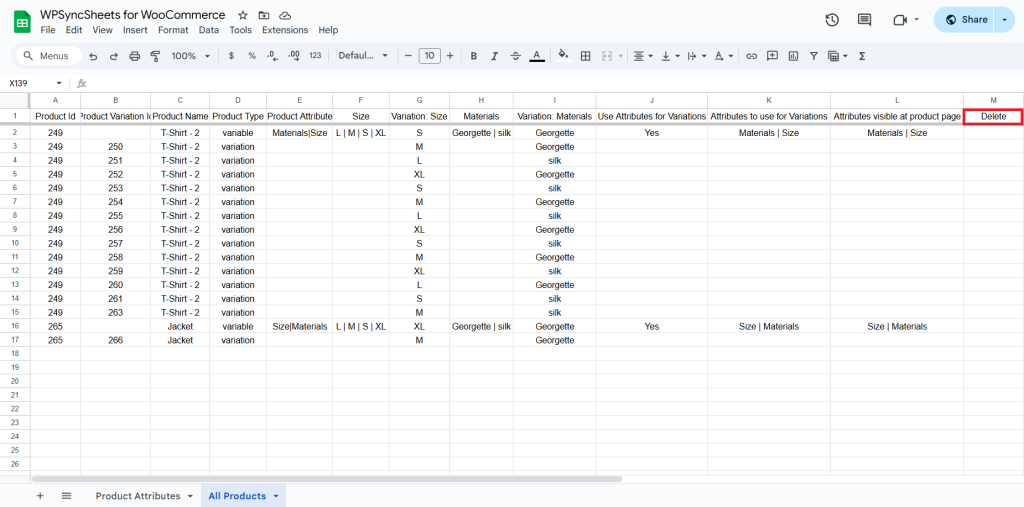
After you save the settings, you will have the “Delete” column in your connected Google Spreadsheet parallelly Import Product option in the settings page.
Step 4
In the Delete column of that row, type “1”, to delete a particular row.

Step 5
Click on the Import Product button.
Step 6
Now, you will have the Proceed option, click on it.
Final Spreadsheet
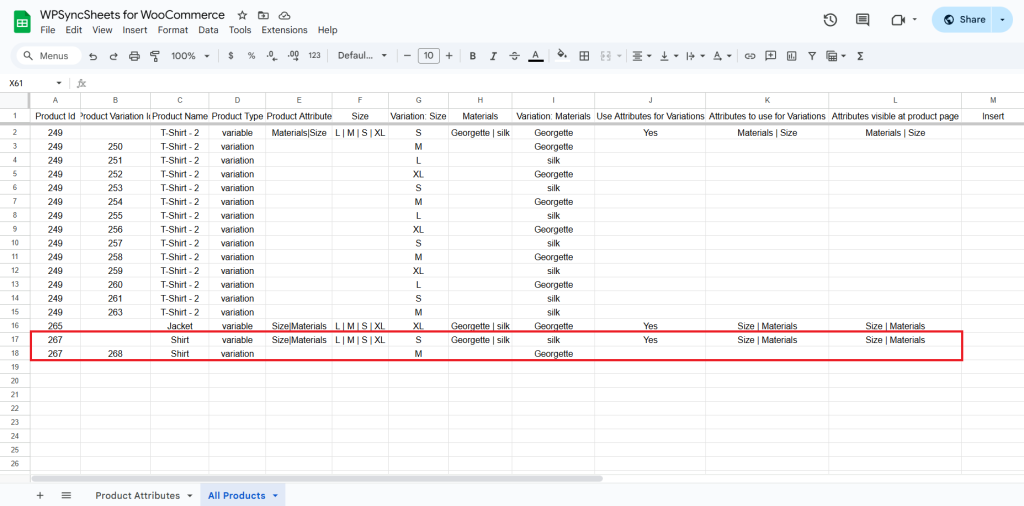
How to insert a variable product along with its variation in a single step
Step 1
Insert Two New Rows:
- One row for the variable product
- One row for the variation
Set Product Types:
- In the first row, set Product Type as variable to create the main variable product.
- In the second row, set Product Type as variation to define its corresponding variation.
Fill in Required Details:
- For the Variable Product Row: Provide the following details:
Product Name, Product Type, Product Attribute, Size, Variation: Size, Materials, Variation: Materials, Use Attributes for Variations, Attributes to Use for Variations, Attributes Visible on Product Page. - For the Variation Row: Provide the following fields:
Product Name, Product Type, and the appropriate variation values (e.g., for size or material).
Leave ID Columns Blank:
Leave both the Product ID and Product Variation ID columns blank. These will be auto-generated during the import process.
Step 2
Make sure type “1” in the Insert column, for both rows to indicate that the variable product and its variation should be inserted.
Step 3
Click on the Import Product button.

Step 4
Now, you will have the Proceed option, click on it.
Final Spreadsheet